DIY Bathroom Sink Repairs Every Homeowner Should Know
Posted by Jack Martin
Filed in Family & Home 4 views
A bathroom sink is one of the most frequently used fixtures in any home. From washing your hands and brushing your teeth to daily grooming routines, it experiences constant wear and tear. Over time, even a well-maintained sink can develop small problems such as leaks, slow drains, loose faucets, stains, or tiny chips. The good news is that many of these issues don't require professional plumbing services. With a few basic tools, the right materials, and a little patience, most homeowners can complete simple repairs themselves.
DIY bathroom sink repairs not only save money but also help prevent minor issues from becoming expensive replacements. Learning how to identify common problems early and fix them correctly can extend the life of your sink while keeping your bathroom looking clean and functional.
In this guide, you'll learn the most common bathroom sink problems, the tools you'll need, and practical repair methods that almost any homeowner can handle safely.
Why DIY Bathroom Sink Repairs Are Worth Learning
Hiring a plumber for every small issue can become expensive. While major plumbing problems should always be handled by professionals, many everyday sink repairs are straightforward enough for homeowners.
Benefits of DIY sink repairs include:
- Saving money on labor costs
- Preventing small issues from becoming major repairs
- Extending the life of your sink and plumbing fixtures
- Improving the appearance of your bathroom
- Building confidence in basic home maintenance
Even spending an hour on preventive maintenance can help avoid costly repairs later.
Essential Tools You'll Need
Before starting any repair, gather the proper tools. Having everything ready makes the process easier and reduces frustration.
A basic bathroom sink repair kit should include:
- Adjustable wrench
- Slip-joint pliers
- Screwdriver set
- Bucket
- Microfiber cloths
- Plumber's tape
- Silicone sealant
- Utility knife
- Soft sponge
- Flashlight
- Rubber gloves
Depending on the repair, you may also need replacement washers, O-rings, or a drain cleaning tool.
Common Bathroom Sink Problems
Bathroom sinks experience several types of wear over the years. Fortunately, many of these problems are relatively easy to fix.
Slow Draining Water
One of the most common complaints is a slow-draining sink. Hair, toothpaste, soap residue, and cosmetic products gradually collect inside the drainpipe, restricting water flow.
Start by removing visible debris around the drain stopper. If the blockage remains, use a drain snake or zip tool to remove hair and buildup. Flushing the drain with warm water afterward helps clear any remaining residue.
Avoid using harsh chemical drain cleaners frequently, as repeated use may damage older plumbing components.
Leaking Faucet
A dripping faucet wastes water and increases utility bills.
In many cases, replacing a worn washer, cartridge, or O-ring solves the problem.
Before beginning:
- Turn off the water supply.
- Remove the faucet handle.
- Inspect the internal components.
- Replace damaged parts.
- Reassemble the faucet carefully.
Testing the faucet before completing the repair ensures everything functions correctly.
Loose Faucet Base
A faucet that moves while being used usually has a loose mounting nut underneath the sink.
Using an adjustable wrench, carefully tighten the mounting hardware without overtightening, as excessive force can damage the sink or faucet.
After tightening, test the faucet to confirm it remains stable during use.
Fixing Minor Sink Chips
Small chips along the sink edge often occur when heavy objects are dropped accidentally.
While minor cosmetic damage doesn't usually affect performance, repairing chips early prevents dirt and moisture from collecting inside the damaged area.
Begin by cleaning the chipped surface thoroughly.
Allow it to dry completely before applying an appropriate repair compound according to the manufacturer's instructions.
After curing, gently polish the repaired area using a soft cloth to blend it with the surrounding finish.
Repairing Hairline Cracks
Hairline cracks are easy to overlook but should never be ignored.
Even tiny surface cracks may allow moisture to penetrate beneath the finish over time.
If you discover damage during routine maintenance, addressing it early is always the best approach. A detailed guide on porcelain sink repair can help homeowners understand the proper materials, preparation steps, and repair techniques before small cracks become larger structural problems.
Inspect surrounding areas carefully after completing the repair to ensure no additional cracks have developed.
Removing Stubborn Stains
Bathroom sinks often develop stains caused by hard water, soap scum, cosmetics, or rust.
For everyday cleaning:
- Use mild dish soap and warm water.
- Apply baking soda to light stains.
- Clean with a non-abrasive sponge.
- Dry the sink with a microfiber cloth.
Avoid steel wool or harsh scrubbing pads that can scratch the sink's finish.
Regular cleaning keeps stains from becoming permanent and helps preserve the original shine.
Preventing Mold Around the Sink
Moisture around the sink edge creates an ideal environment for mold and mildew.
Inspect the silicone caulk regularly.
If you notice cracking, peeling, or discoloration, remove the damaged caulk completely before applying a fresh bead of waterproof bathroom silicone.
Allow the sealant to cure fully before exposing it to water.
Replacing old caulk not only improves appearance but also protects cabinets and countertops from hidden water damage.
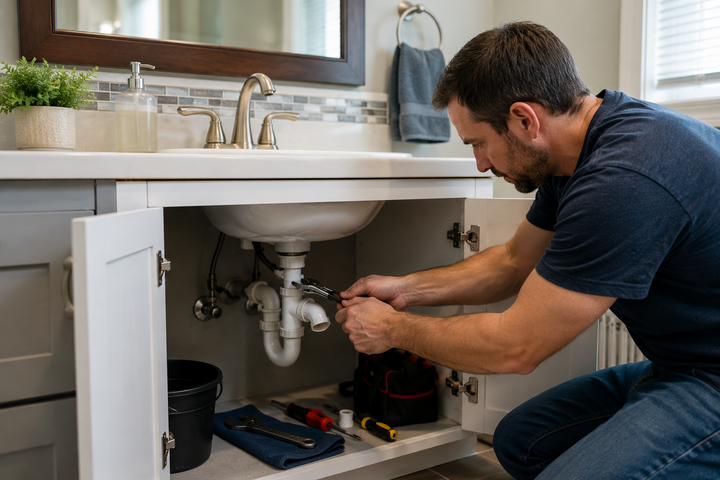
Repairing a Leaking Drain Pipe
A leak under the bathroom sink is one of the first signs that something needs attention. Fortunately, many drain leaks are caused by loose connections or worn seals rather than damaged pipes.
Start by placing a bucket under the sink to catch any water. Dry the pipes with a clean cloth so it's easier to identify the exact source of the leak. Run the faucet for a minute while watching each connection.
If the slip nuts are loose, tighten them gently with slip-joint pliers. Avoid overtightening because plastic fittings can crack under too much pressure. If tightening doesn't stop the leak, inspect the rubber washers or gaskets. Replacing these inexpensive parts often solves the problem in just a few minutes.
After completing the repair, run both hot and cold water to confirm the leak has been fixed.
Fixing a Loose Sink Drain Assembly
If the drain moves when you press the stopper or notice water leaking around the drain flange, the drain assembly may have loosened.
Remove the items stored under the sink to create enough working space. Tighten the retaining nut beneath the drain using an adjustable wrench. If the leak continues, remove the drain assembly completely and replace the old plumber's putty before reinstalling it.
A properly sealed drain prevents water from leaking into the vanity cabinet and protects surrounding materials from moisture damage.
Cleaning the P-Trap
The curved pipe beneath the sink, known as the P-trap, collects debris that prevents sewer gases from entering your home. Over time, hair, soap residue, and toothpaste can build up inside it.
To clean the P-trap:
-
Place a bucket underneath.
-
Loosen both slip nuts.
-
Remove the trap carefully.
-
Empty the contents into the bucket.
-
Rinse the trap thoroughly.
-
Reinstall it securely.
Cleaning the P-trap once or twice a year helps prevent unpleasant odors and recurring drain clogs.
Replacing Old Sink Caulk
The seal between the sink and countertop protects your vanity from water damage. Over time, caulk can shrink, crack, or develop mold.
Remove the old caulk using a plastic scraper or utility knife. Clean the area completely before applying a smooth, continuous bead of bathroom-grade silicone caulk.
Allow the caulk to cure according to the manufacturer's instructions before using the sink.
Fresh caulk improves both the appearance and durability of your bathroom sink installation.
When Should You Repair Instead of Replace?
Many homeowners assume any visible damage requires a new sink, but that's often unnecessary.
Repairing your sink is usually the better option when:
-
The damage is cosmetic.
-
Chips are small.
-
Cracks are limited to the surface.
-
The faucet and plumbing remain in good condition.
-
The sink is securely mounted.
Replacement becomes a better investment if the sink has multiple structural cracks, severe water damage, or extensive deterioration that affects everyday use.
Preventive Maintenance Tips
Regular maintenance is the easiest way to avoid expensive repairs.
Simple habits include:
-
Wipe the sink dry after daily use.
-
Clean the drain every few weeks.
-
Remove soap residue regularly.
-
Check plumbing connections for leaks.
-
Avoid dropping heavy objects into the sink.
-
Repair small problems before they become larger ones.
These small tasks only take a few minutes but can significantly increase the lifespan of your sink.
DIY Mistakes to Avoid
Even experienced homeowners occasionally make mistakes during simple repairs.
Avoid these common errors:
-
Using excessive force when tightening fittings
-
Ignoring small leaks
-
Applying too much sealant
-
Using abrasive cleaners on delicate finishes
-
Skipping cleaning before making repairs
-
Forgetting to turn off the water supply
Working carefully and following the correct steps produces better long-term results.
Safety Tips for DIY Repairs
Safety should always come first when working around plumbing.
Before beginning any repair:
-
Shut off the water supply if necessary.
-
Wear protective gloves.
-
Keep electrical appliances away from standing water.
-
Use the correct tools for each repair.
-
Work in a well-lit area.
Taking a few extra precautions helps prevent injuries and accidental damage.
Frequently Asked Questions
Can I repair a bathroom sink without replacing it?
Yes. Many common issues, including minor leaks, loose faucets, clogged drains, small chips, and surface stains, can often be repaired without replacing the entire sink.
How long do bathroom sink repairs take?
Most simple DIY repairs take between 30 minutes and two hours, depending on the problem and your experience.
What causes bathroom sinks to crack?
Heavy impacts, temperature changes, poor installation, and aging materials are common causes of sink damage. Addressing small problems early helps prevent larger repairs later.
How often should I inspect my bathroom sink?
A quick inspection every few months allows you to catch loose fittings, leaks, worn caulk, or small surface damage before they become serious issues.
When should I call a professional?
If the sink has major structural damage, recurring leaks inside the wall, or plumbing problems that continue after DIY repairs, it's best to contact a qualified plumber.
Final Thoughts
Learning basic bathroom sink repairs is a valuable skill for every homeowner. From clearing slow drains and fixing leaking pipes to replacing worn caulk and tightening loose fixtures, many common problems can be solved with simple tools and a little patience.
The key is to act early. Small leaks, minor chips, and loose fittings rarely improve on their own. Regular inspections and preventive maintenance help keep your bathroom sink clean, functional, and looking its best while reducing the likelihood of costly repairs.
By understanding these simple repair techniques and following a consistent maintenance routine, you can extend the life of your bathroom sink, protect your home from water damage, and save money on unnecessary service calls.